Self portrait with an Instax Mini Evo, Lens #1 (Normal), Film #10 (Retro) with a Nikon Soft-2 Filter held over the lens.
Fujifilm isn’t afraid of taking creative risks. The latest example is the X half compact camera that I recently reviewed. The thinking behind the X half is that you move all the creative choices forward to the capture stage. No post-processing required.
In part, Fujifilm accomplishes this by offering a cornucopia of film simulations and wild filters that can create light leaks, enhanced grain, and lots more. RAW files are not an option with the X half - Jpegs only. And if you want to go more retro, you can capture in Film Mode that disables the LCD so you can’t see your images until you “process” them on a smartphone running the Fuji app.
The X half is a cool little camera designed for a niche in the photography universe. I’m curious to see how warmly it will be embraced.
Many of these same features are on the Instax Mini Evo, one of my creative cameras of choice. I like the mini Evo for its over-the-top effects and simulations, plus it can print as well as capture. It’s an all-in-one fun machine.
The prints from my mini Evo make wonderful keepsakes that you can share with friends and family.
To add even more fuel to this approach to photography, I have a Creative Camera Techniques Online Workshop beginning on June 5. This workshop is all about capture, exploring techniques that range from putting scratches in filters to create star effects, to stacking multiple exposures, to adding rainbows with old compact discs.
It’s refreshing to take a break from RAW processing, brushing masks, and all that stuff. I feel like I’ve enrolled in summer camp for photography, exploring the world at a pace I don’t have time for during the school year.
Does this mean I’m going to sell my laptop, don a beret, and forever eschew RAW files? It does not!
But with summer on the way, and the creative camera workshop starting next week, I’m going to enjoy taking a break from my normal workflow and playing with these alternative techniques.
It’s fun having fun taking pictures.
Thanks for reading The Nimble Photographer! Subscribe for free to receive new posts.
As I thought about it over the preceding months, I wavered back and forth between “this is something that I think my listeners would enjoy” to “Oh my God, that is so self-congratulatory.” Once I reached 960 episodes, however, I knew I had to decide one way or another. These things take time to put together.
Then, in February, when Saturday Night Live aired its 50th Anniversary Special, I realized how wonderful these celebrations can be. I loved that show. The way they mixed the old with the now was so well done, and entertaining. I was inspired.
I decided that I wanted to do something along the same lines. Interview friends who were there in the early days (Frederick Van and David Lents), talk about the future with Rob Knight, and have as many listeners as possible chime in.
That last element became the most important.
Since the show has published, I’ve received lots of feedback. And invariably, one or more of the listener spots would be highlighted as a favorite part of the lineup. Now that I think about it, I’m not surprised.
Photographers who tune in to The Digital Story, and who participate in our events (Inner Circle, online classes, in-person workshops) are part of a community that’s important to them. I’ve known this for years, but the depth of those feelings so impressed me when listening to their cameos.
Those heartfelt recordings touched other listeners as well. People would write or comment to me, “I really appreciated Jim’s thoughts about community, Sergio’s warmth, Scott’s favorite shows, Lawrence’s reinvention, and Tim’s story from Durango.”
Those wonderful words… they are now captured for anyone who cares to tune in.
The week before the 1,000th episode, I was in the Northern California Redwoods leading a workshop with seven of our community photographers. I had previously recorded all the guest spots for the show, but I hadn’t done the intros, outros, and voiceovers yet.
So, of course, I caught a bad cold while on the road. When I sat down in front of the mic on Monday to record my bits for the celebration, my voice was raspy. It sounded like an echo chamber in my head. I was disappointed.
But that’s the thing about podcasting. No matter what happens, figure out a way to record the show and publish. I spoke as smoothly as I could, then adjusted the tone in post production. I’m hoping it wasn’t a distraction. No one has asked me if I had a cold yet. I consider that a good sign.
Then, just before midnight Monday, I pushed the Publish button, and the show was live. I was exhausted from the marathon week, the stupid cold, and the travel. I couldn’t get to sleep for hours. But I didn’t care because I was thrilled that we had pulled this off.
Going back to the beginning of the year when I was contemplating whether or not to record a celebration show - I didn’t realize at the time how heartfelt the endeavor would be.
Sometimes you have to say things out loud for others to realize how you feel. Thanks to everyone in our community who took the time to speak up with their thoughts and feelings.
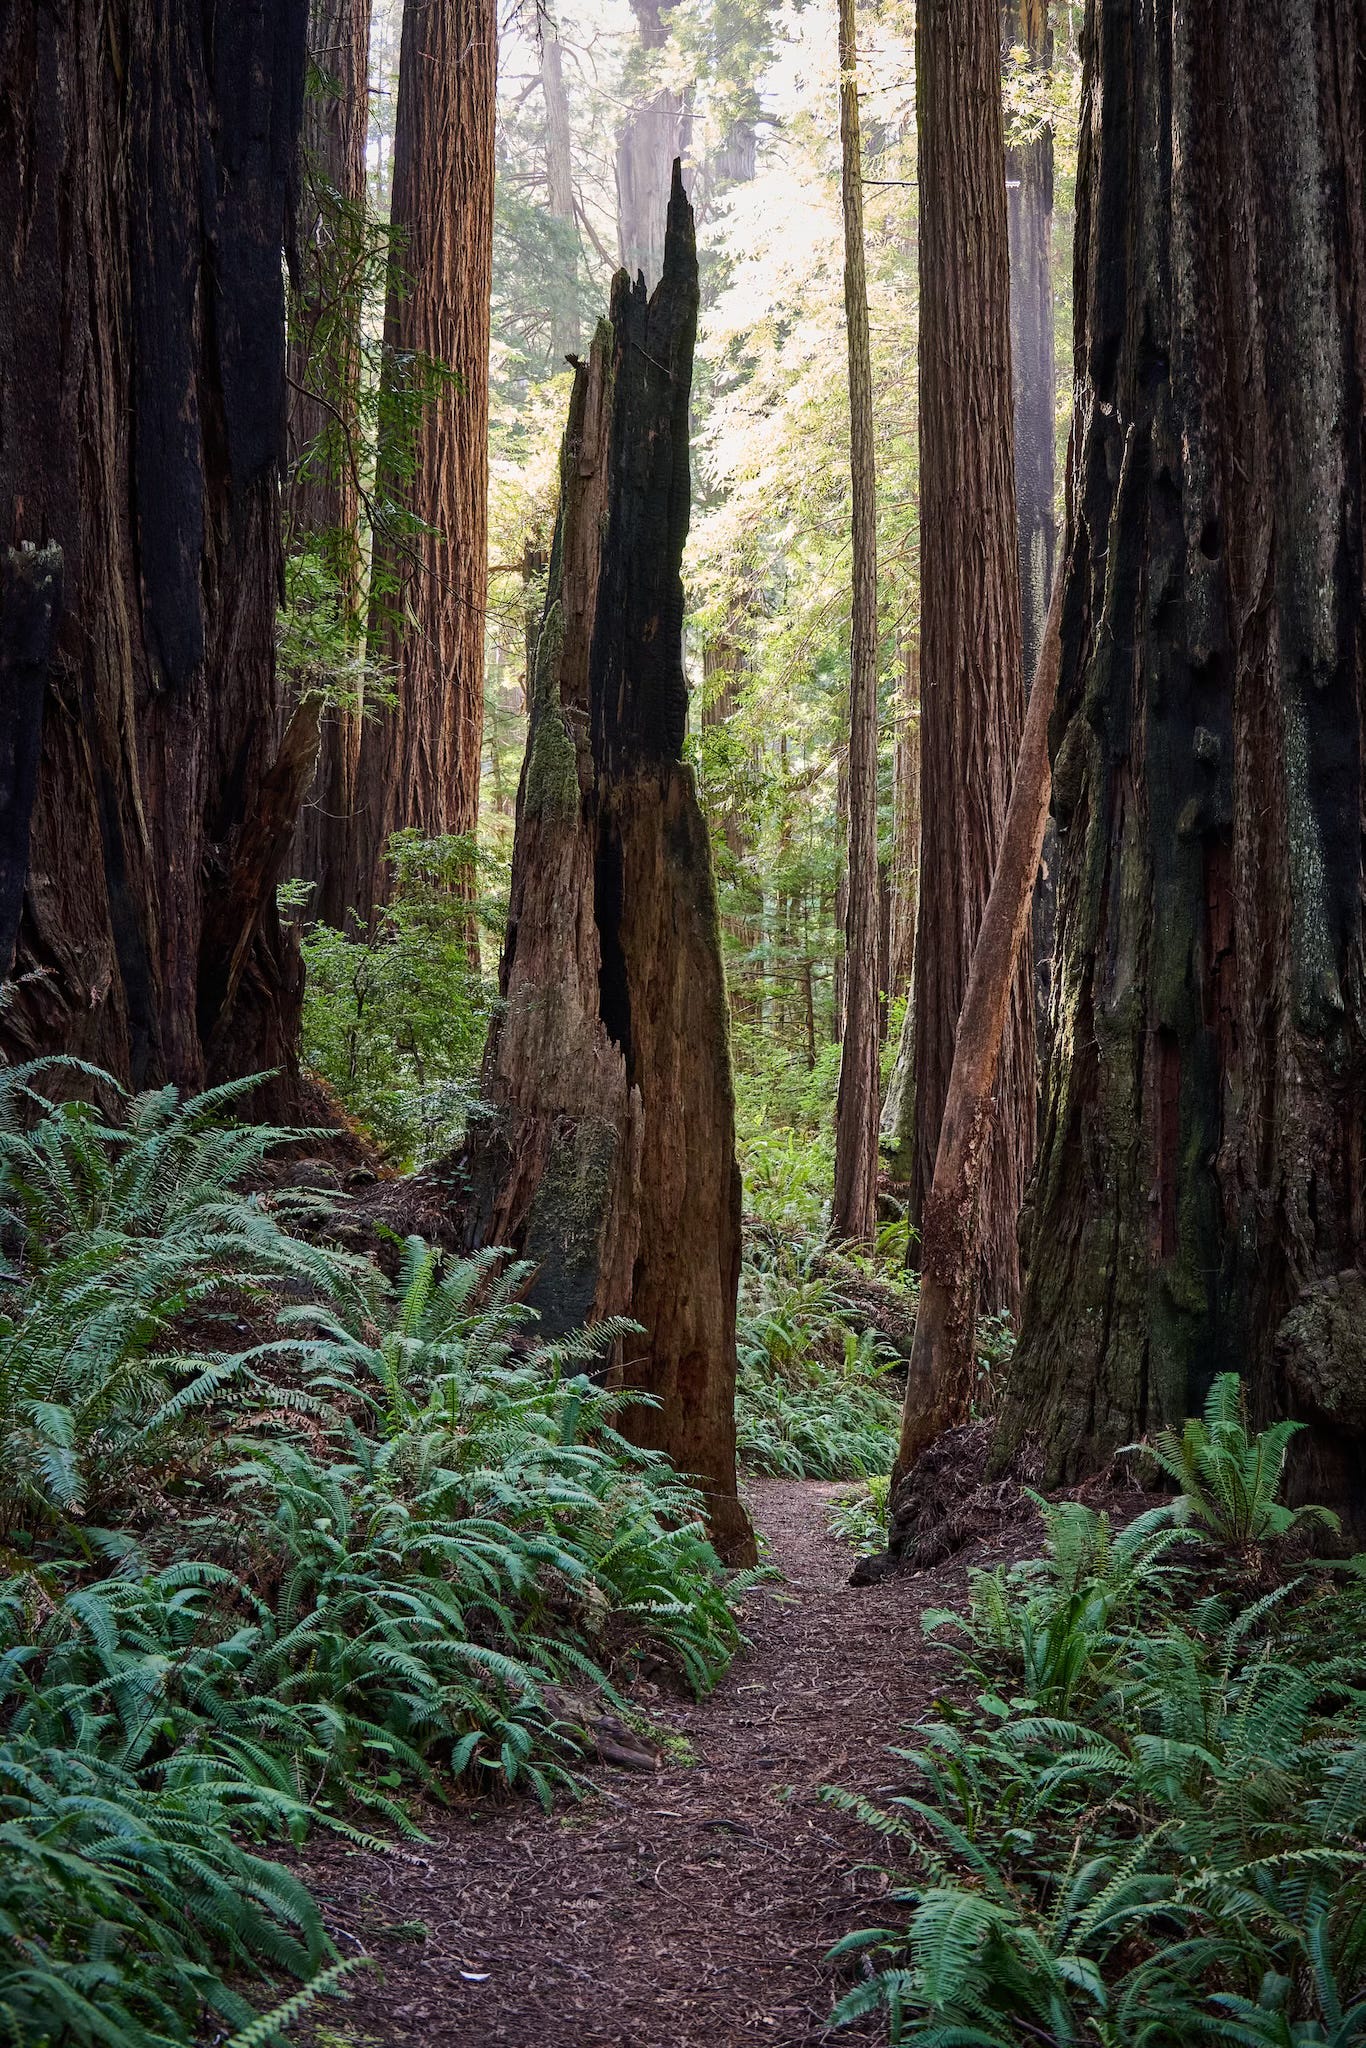
When I’m scouting for my photography workshops, I travel as light as possible. I often have to visit 5 sites a day, sometimes more, to determine the best spots for our group. This often includes a fair amount of hiking.
I never pack a tripod for these trips. I don’t want to carry one, and I don’t have the time to use it. On a recent scouting trip for our upcoming Redwoods Photography Workshop, I worked with a Nikon Zf, 28-400mm f/4-8 zoom lens, and my iPhone 15 Pro Max. This rig allowed me to work quickly and flow seamlessly from one location to another.
I used Auto ISO on the Zf, allowing it to climb as high as 25,600. The lighting in the redwoods can be quite dim, plus, I wanted to shoot at f/8 to provide some depth of field with that full-frame sensor. (Fortunately, I never had to go above ISO 9,000!)
The Zf has sensor-based image stabilization, which helped with sharpness, especially when racking out the telephoto to 300mm or more. My shutter speeds were typically between 1/15th and 1/125th of a second.
Charred Tree - ISO 2,500
When I reviewed my images, I noticed that many of them were in the ISO 2,500 - 2,800 range. Once upon a time, we would never have considered such settings for landscape photography. But honestly, the RAW files looked great and were quite editable.
Fallen Tree - ISO 9,000
The ISO climbed as high as 9,000 for some of the images. (This isn’t something that I would normally allow!) But I have to say, they looked just fine.
Trillum Flower with Pollen on Leaves - ISO 9,000
For the above Trillium Flower shot, I applied Luminar Neo’s Noise Reduction while editing. I had noticed some grain in the background that was a bit distracting. Luminar did a great job of eliminating it.
I’m not advocating tossing your tripod in the trash. But, when you’re in situations without it, and you have a camera capable of climbing the ISO ladder, take the shot!
It’s a lot easier to eliminate noise than to fix a lack of sharpness due to camera shake. And sometimes it’s nice just to have fun taking pictures.
Before I go into the review itself, I want to share an anecdote about the MacBook Air M4. I was working on location in a brightly lit atrium of a Hyatt Regency hotel. About mid-morning, the sun burst through the clouds and illuminated the entire area where I was seated.
My laptop was bathed in bright light. It was like working outdoors. I pressed the F2 button a couple of times to intensify the readability of the document I was editing. Everything was fine. I continued my work with ease.
I mention this because so much has been written about the difference in illumination between the MacBook Pro and the MacBook Air M4. Some commenters have gone as far as saying that it’s the “big gotcha” that Apple doesn’t mention.
The MacBook Pro screen is better than the MacBook Air M4. The specs show that. But after a month of using the Air in a variety of conditions, including the glowing atrium at the Hyatt Regency, I haven’t had a problem or a complaint regarding the quality of the display.
Everyone has their opinion. That’s mine. Now, on to the review.
What I liked about my 2021 MacBook Pro M1: The ports.
In March, I boxed up my 2021 MacBook M1 MacBook Pro and sent it to Apple Trade In. If it checked out, as I knew it would, they would credit me $810 toward the purchase of a new M4 MacBook Air. And that's exactly what happened.
My photographer friends were surprised by this move. A MacBook Air did not seem like the right choice for running a business that depended on apps such as Capture One Pro, Lightroom, and Final Cut, not to mention audio software for the podcast.
"Plus, what about the ports? And there's no SD card reader!"
My response: This was not a decision that I took lightly. I researched my options and made a choice based on not only what I wanted, but what would work as well. They were interested in those reasons. And I thought you might be, too.
What I Want from My Laptop
My overriding goal is to travel as light as possible. This influences my camera choices, lens options, and yes, post-processing tools. I carry around an OM System OM-3, and I love the iPad mini 7. It doesn't make sense to lug around a heavy laptop if I don't need to.
That's why my 2021 MacBook Pro just wasn't making as much sense as it once did. And with the evolution of the Air, I thought a switch might be feasible. Here are some of the factors I considered.
Nimble Size and Weight
I'm on the road quite a bit, facilitating workshops and taking pictures. The MacBook Pro felt like a beast compared to the 13" M4 Air that I'm typing on right now. The difference between its 3.5 pounds vs the Air's 2.7 pounds does sound like much, but in real-world use, it's substantial. My backpack, in particular, feels so much lighter.
The physical dimension difference is noticeable, too. The MB Pro is 0.61 inches thick, 12.31 inches wide, and 8.71 inches deep. The Air is only 0.44 inch thick, 11.97 inches wide, and 8.46 inches deep. Again, that might not sound like a big difference, but the M4 Air fits in bags that the MacBook Pro does not. I'm no longer running into the problem of “it's just a little too big.”
Processing Power
Compared to an M1 Pro processor, you wouldn't think that the 10-core M4 performance would be that discernible. And for tasks like web browsing, it isn't.
But when I set up an Export job in Capture One Pro, and it's done so quickly that I was thinking that I forgot to initiate it, the speed difference is striking. I've found myself double-checking folders to see if anything was happening, only to discover the task was completed and all the images were there.
After a couple of weeks of use, I can confidently say that the M4 MacBook Air has all the horsepower I need, and more, for my work.
You may be wondering about my configuration. I settled on the 10‑core CPU (4 performance cores and 6 efficiency cores) with the 10‑core GPU, 24GB RAM, and a 1TB SSD. The cost was $1,599. Subtract the $810 trade-in, and my outlay for the new laptop was $789.
What I'm Giving Up
One of the prime motivators for the 2021 MacBook Pro purchase was the return of the built-in SD card slot, HDMI port, and three Thunderbolt 4 ports (two on the charging side and one on the HDMI side). My prior MacBook Pro had an Intel processor with four Thunderbolt ports and nothing else.
But the world was different then. USB-C was not ubiquitous. So I was always fooling around with adapters and dongles. These days, my iPhone, iPad, and all of my cameras are USB-C. One cord works for all of them. And technologies like AirDrop and AirPlay reduce the need for cables and adapters.
The MacBook Air has two Thunderbolt 4 (USB-C) ports with support for charging, DisplayPort, Thunderbolt 4 (up to 40Gb/s), and USB 4 (up to 40Gb/s). It adds the same MagSafe charging port that my Pro had.
The extra ports don't seem as important as they used to be. I use a svelte Acer USB-C card reader for all my devices. It fits in my jeans’ coin pocket. I carry a USB-C cable that connects everything to everything, even my 15" 4K display that I use on occasion.
There are a couple of other specs I was curious about, such as 500 nits of brightness for the M4 Air vs. 1,000 nits for the M1. The Air refreshes at 60 Hz vs 120 Hz for the MB Pro. In real-world use, I haven't thought about the differences. I could see situations where these specs could be important. Fortunately for my work, it doesn't seem to matter.
When I Do Need More Screen Real Estate
The M4 Air can power two external displays plus its own screen.
The new M4 MB Air upped its game with display support. It simultaneously supports full native resolution on the built-in display at 1 billion colors and up to two external displays with up to 6K resolution at 60Hz. It provides Thunderbolt 4 digital video output and support for native DisplayPort 1.4 output over USB-C.
With just one USB-C cable, I can connect my 15" 4K display. And if I wanted, even add another. Plug and play. Honestly, it couldn't be easier.
Smile, It's Showtime
Zooming is a delight with the MacBook Air M4.
A welcome improvement with the M4 Air is the 12MP Center Stage camera with support for Desk View and 1080p HD video recording. Coupled with the three-mic array, I can Zoom from anywhere that has Internet, and look and sound great without any extra gear.
This is a noticeable upgrade from the previous 1080p FaceTime HD camera that I was using on the M1.
This is one of those areas that I so appreciate the feature improvements. It wasn't that long ago that I had to pack a webcam and external mic for teaching online away from my studio. Now, I open the M4 Air, launch Zoom, and I'm ready to go.
And Finally, Just a Few Little Nerdy Things
The M4 Air also incorporates wireless upgrades over the 2021 MBP with Wi-Fi 6E vs WiFi 6, and Bluetooth 5.3 vs 5.0. The M1 provided 11 hours of wireless Web compared to 15 hours of life for the M4 Air.
My Bottom Line
I would never have dreamed that I could switch from a MacBook Pro to an Air and be happier. But I am.
My productivity is just as good, if not better. I'm traveling lighter than ever. Plus, the Midnight MacBook Air is the most handsome laptop I've ever used.
I use my cameras and computers to make a living. But consumer electronics have improved to the point where professionals can use them, saving money and traveling lighter.
The M4 MacBook Air is a perfect example of this.
Thanks for reading The Nimble Photographer! Subscribe for free to receive new posts.
Having just captured a beautiful wedding this past weekend with my Nikon Zf, I was already starry-eyed with the camera. It performed so well! Then I learned that the much-rumored Firmware 2.0 dropped. Now our fates are forever intertwined.
Wedding photography with the Nikon Zf with Nikkor 24-85mm zoom (via FTZ II adapter). Photos by Derrick Story
Firmware updates are one of the great joys of digital photography. When done right, they invigorate the camera's performance and add new features as part of the bargain. The latest from Nikon has so many goodies that I don’t have time to list them all here. But you can see for yourself on the firmware update page.
I’ve been exploring new features for the past two mornings, and I still haven’t gone through them all. But I do have a few favorites to share with you now.
Non-CPU Lens Data
Nikon Zf photographers generally love manual focusing lenses. But unfortunately, those optics don’t share EXIF data with the camera. Last week, I wrote about one such lens, the 7artisans 18mm pancake, and how much fun it was to shoot with this sub-$100 super wide.
Fortunately, Nikon provides a way for us to include some EXIF with those images, and with Firmware 2.0, Non-CPU Lens Data allows for even more information. I can now add the lens name and aperture to the metadata. This makes a huge difference in my picture catalog.
I can now have my non-CPU lenses and my EXIF data.
Nikon Imaging Cloud with Downloadable Imaging Recipes
The Zf is a master of disguise, enabling us to create a variety of different looks with its Picture Controls. This ability has been turbocharged with version 2.0
Zfs now have access to Nikon Imaging Cloud with a menu of features, including future firmware updates and access to Creator Picture Controls.
Nikon Imaging Cloud is now available to the Zf. I love the Creator Picture Controls.
I’ve added six new imaging recipes to my camera, and I can add more or swap for others as discover favorites.
It takes a few minutes to connect the camera to Nikon Imaging Cloud. Be patient and work through it. Once the connection is made, it’s easy to use.
More Goodies Than I Can Count
“Birds” have been added to Subject Detection Objects, half-press to cancel Manual Focus zooming, Live View Display Zoom is now up to 400 percent, High-Res Zoom added for video recording, and one of my favorites (shared with me by a friend), Cycle AF. Here’s what Jim Kuzman wrote:
“Cycle AF can be programmed to a button, and each time you press it, it advances to the next AF area. You can choose which AF area modes are included/excluded.
Go to Custom Settings > f Controls > f2 Custom controls (shooting) > and select a button. Scroll until you find Cycle AF-area mode, arrow right to select the modes you make available or eliminate, and push Menu. I find it much easier to just push the button a couple of times to change the AF area than to hold down the button and rotate the front command dial.”
I reprogrammed my red dot Record button to Cycle AF and love it! (How did I live without this before?)
The bottom line is: Robust firmware updates are fun and energizing. And when the manufacturer addresses requests by users, then adds new features, it strengthens the bond between camera and photographer.
If you have a favorite new feature from Zf Firmware 2.0, please share it in the comments.
Thanks for reading The Nimble Photographer! Subscribe for free to receive new posts.